Tuesday, August 14, 2018

Coat Pocket Placement and Buttonholes

Pocket Placement

An unfortunately often overlooked detail in reproduction 18th century clothing is the placement of the pocket flaps, button hole and buttons. This detail, though small, can really make or break the look of an outfit. Most spectators would not know if your clothing was made out of inaccurate fabric, is cut incorrectly, or is of the wrong decade, but if your pocket is in a weird place they'll be able to tell that something is up.

Pocket and button placement is actually fairly simple. It should follow a straight line. If you draw a line from the bottom most button(hole) to the top of the side vent, the top of your pocket (or at least the top corners) should be right on that line. You can see that illustrated on the pattern to the right and again on the picture of the coat front that I'm redoing (pardon the terrible looking pocket flap; it's part of what I'm redoing). The same guidance is true for waistcoats. 

I have seen far too many frock coats and waistcoats that look absolutely wonky because the pockets are either way too high or way too low. It may be a small detail but spectators notice. It has nothing to do with knowledge of historic clothing. The logical symmetry just looks off and people take note.

Pattern Hack: A Note on Button Holes
I have a love/hate relationship with buttonholes. I love how a finished, properly placed buttonhole looks, but I hate sewing them.

In Art du Tailleur, M. de Garsault instructs that buttonholes be spaced about two inches apart on coats and waistcoats, which is a good general guidance. Most extant frock coats have 10 buttonholes, so you may find that spacing your buttonholes exactly two inches apart gives you with extra space between the top hole and the collar. I found that spacing the holes 2 1/8 inches a part gives me perfect spacing for 10 buttonholes. I came to that conclusion after plenty of experimenting, which can be seen by the various chalk marks on the coat front.

Drawing the button holes is fairly simple if you have a quilting ruler with a grid pattern on it. Once you have the first hole drawn, you simply draw the next one parallel to it 2 1/8 inches above it. Keeping them parallel causes the buttonholes to angle in relation to the curved lapel as you move further up the body. I find that most commercial patterns place the bottom button hole correctly, but they lose the proper spacing as you move up the torso so using this method creates a better looking coat front.

Another detail that is overlooked in reproduction patterns is the size of the buttonholes. They are too short. The pattern that I use calls for 3/4-1 inch buttons and then has lines for 2 inch-long buttonholes. In the 1770s, a fashionable gentleman's buttonholes would be about 2.5-times the size of the button. I am using 1 1/4 inch buttons on this coat, so the holes are 3 1/8 inches long. I'm gonna look Macaconi AF when this thing is done!

In a later post, I plan to cover my method for doing long work buttonholes, but I think that I'll leave it here for now.


Thursday, August 9, 2018

Art of Cookery Made Plain and Easy

Here's a fun one. An cookbook that is the 18th century equivalent of The Joy of Cooking. Enter Hannah Glasse's Art of Cookery Made Plain and Easy. It's a good book and it is fairly easy to follow the recipes for the most part. Some recipes titles do not accurately describe what you are making, you will come across a few ingredients that you've never heard of here or there, and there will be some ingredients that no one makes any more, but this is otherwise a mostly straight forward and easy cook book for living historians and 21st century persons alike. Besides, where else are you going to find a recipe to roast a whole pig or cow's head?


The best part about this book is that it's in the public domain, so you can find a full copy of it on Archive.org here: TheArtOfCookery. I've personally made quite a few recipes from this book, including beef cooked in ale, the chicken marinade (a delicious 18th century fried chicken recipe), and many of the various rabbit recipes (yes, we eat a lot of rabbit, but that's another story for another day.) 

Check it out. If you'd rather spring for a print version, various people sell reprints for under $20 and I know of a few 18th century printers and binders who make fantastic reproductions.

Wednesday, August 8, 2018

So... Many... Buttons...

Sure, it would be a good idea to change out all the buttons on your frock coat to be deathshead button. How many buttons are on your frock coat? 28. How big are they? 1 1/4 inch. This was a bad idea, but at least they look good. 16 down, 12 to go.


Thursday, August 2, 2018

Deathshead Button Tips

An unfortunately underrepresented detail in reproduced men's 18th century clothing is the deathshead button. If you were to take a census of the buttons on a group of living historians you would most likely find that metal buttons take the lion's share as they are prevalent on most mainstream clothing. Then you would find cloth covered, which is more accurate to the period. Deathshead buttons taking up the rear.

In reality, metal buttons were rare. A very quick look at period artwork and extant garments illustrates that cloth-covered and deathshead buttons were the most common. The reasoning is simple. Metal buttons were more expensive, and they weigh down the garment in an undesirable fashion causing waistcoats and coats to lose their desired form on the person. Metal buttons are more popular among reenactors because they require no time to manufacture, and they are easy to replace. Those who prefer to be more accurate choose cloth covered buttons because they are simpler to make than the deathshead alternative.

Deathshead buttons are awesome. There is no denying that. They are also a pain in the butt to make. Silk thread is slippery which does not mesh well with the process for making deathshead buttons which is to wrap a square around a circle. I avoided them for the greater part of a year because the thread constantly moved until I learned a trick that makes the buttons turn out great every time.

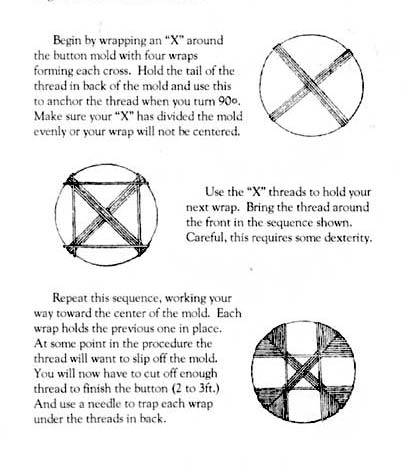
The process for making a button is simple in theory. Wrap three loops of thread around the mould to make an X. Then using the ends of the X as corners, wrap the thread to make a box. Secure the thread on the back and you're done. That works ok for linen thread, but when using silk, the X threads constantly slide so you lose your corners. Also, as you get closer to the center of the box those threads will move as well. Here are a few pointers that I use to make your buttons turn out great every time.

Tip 1 - Create a More Secure X

Instead of just wrapping the thread around the button mould to make and X, I thread the end of my silk through a needle then draw a length through the hold in the center of the mould. I then weave that side of the silk thread through the hole in the center of the mould to create the X. After I've created the X, I secure the crossover in the hole with a knot and cut of the excess leaving the spool side of the thread still attached. Weaving the thread through the hole makes a secure X that does not move no matter what. This is the most important tip and the key to making a good deathshead button. You will use a little more thread, but it's worth it.

Tip 2 - Use a Pin


The second most frustrating part of wrapping these buttons is that the thread does not stay in place as you get closer to the center. To prevent that from happening, stick a pin through the center so that the thread on the back of the button has an anchor point as you change from wrapping vertically to horizontally and vice versa. On buttons that have a diameter larger than 5/8 inches, you can do a few wraps without the pin, but with smaller buttons I would use the pin throughout.

These pictures show me making a 5/8 inch button using the a pin the entire time. The wraps turn out fairly uniform by themselves and can be adjusted slightly with a pin, toothpick, or other small item that you can use to push the threads into the desired place.

After finishing my wraps, I will loop the thread around the pin on the back of the button a few times to anchor everything in place. Then I cut the thread and use a needle to secure the back in place.

I have found that smaller buttons do not turn out looking as well as larger ones. My 1 1/4 inch buttons for my frock coat look exponentially better than these smaller buttons for my waistcoat.

Tip 3 - Get Some Pliers

Securing the button in place can be the hardest part if you don't have the right tools. If you made your button correctly the center is a tight mess of strong silk thread. Driving a needle directly through the center of that mess to secure the center in place is no picnic. Take my advice and forego strong manning it by using a thimble and a pair of pliers. Use the thimble to push the needle through the button until you can see the point on the other side, then use your pliers to pull it though. It will save you so much time, not to mention holes in your fingers.

Tip 4 - Buy Enough Thread

Deathshead buttons look awesome, but they use a lot of thread and are expensive. Button moulds are about $0.80 a piece and silk thread is about $6.50 per spool. In my experience, you can make three 1 1/4 inch buttons from one spool of thread, or eight to 10 5/8 inch buttons. An average frock coat has 28 buttons, so you're talking about nearly $90 to make your buttons. That may be expense, but it is totally worth it to be the most macaroni person out there.

Thursday, July 26, 2018

Council of Safety Musket

"This is my rifle. There are many none like it, but this one is mine." 


Ok, so there were more like it, but I do not know of any rifles out there right now in the living history community that are like my rifle. My rifle is a to specification copy of a Maryland Council of Safety musket based off of documentation and surviving examples. What is a Council of Safety Musket you ask? I'll tell you.

A Council of Safety, more commonly a Committee of Safety, or just COS Musket were domestically produced muskets that were made in the early days of the American Revolution by each province to outfit their Provincial Line troops and militias. In 1775, seeing as the united colonies were at war with Britain in practice and Britain was most likely not going to sell munitions to the colonies that they are currently at war with, each colony's Committee of Safety (or Council of Safety in Maryland because we have to be different) past resolutions for local gunsmiths to produce muskets to outfit their troops. These domestically produced muskets, commissioned and purchased by the COSs for the provincial troops, were many of the provincial assemblies plans to arm their soldiers until the Continental Line began receiving arms from France.

Each colony's COS had different specifications for their COS musket, if they had specifications at all. Most of the muskets were based off the Brown Bess musket that was in use by the British forces. Most colonies based the design on the Short Land pattern or Second Pattern Brown Bess, but some colonies like Connecticut based the design on the older Long Land pattern Brown Bess with a distinctively longer barrel.

The Maryland Muskets were based on the Short Land Brown Bess, and had the exact same specifications as the British Musket. The exact specifications from the "Journal and Correspondence of the Maryland Council of Safety" from August 2, 1775 is below: 

"...The dimensions of which may be 42 inches in length, 24 of an Inch clear in the bore 1 1/2 inch diameter at the breech, and 7/8 of an Inch at the Muzzle) with Steel rammers and Bayonets 20 Inches in length including the Stock... If this mode meets with your Approbation, we recommend, that each Gun be proved before it shall be received, and when proved, that the word Maryland be stamped on the Barrel."

My musket meets those exact specifications down to the Maryland stamping on the barrel. My musket is a Pedersoli reproduction Brown Bess that was modified by Lodgewood Mfg., a gunsmith in Wisconsin that specializes in restoring antique firearms and modifying modern reproductions to be historically accurate to the originals. 

Lodgewood based the modifications of my musket on a surviving Maryland COS Musket that is in the collection of George C. Neumann and featured in his book on American arms during the Revolutions. Their write up of a more generic COS musket based on the Neumann example can be found here.


The stock of the musket has been reshaped to remove the distinctive Brown Bess features and make it more in line with the American muskets. The color was also darkened and the steel browned.

 A ton of work was done to the lock. The end of the frizzen spring was reshaped from the fleur de lis pattern found on the Bess to the leaf-like pattern on COS muskets. The hammer was reshaped and all marking were removed from the lock plate.


A screw was added to the thumb plate, which seems like a very small and weird feature, but it is something that is very distinctive of COS muskets.


The coolest thing about this musket is on the barrel. Lodgewood relocated all legally required markings to hidden spots to achieve a period correct look. They then stamped MARYLAND on the barrel in accordance with the specifications from the Maryland COS. Fortunately, I was able to find one surviving example of the Maryland proof stamp, which is on a COS pistol in the collection of the Smithsonian (to the right).

When Lodgewood and I were working on this build, they pointed out that the proof marks on the Smithsonian example are engraved as opposed to stamped like the instructions from the COS stipulate, but they could still stamp to the same font, and most likely the proof stamp would have broken after being used many times because they were made from softer steel and not hardened properly. That is probably the reason that the Smithsonian COS pistol is engraved and no other Maryland COS muskets (that I've seen) have the proof marking. After much deliberation, I decided to have Lodgewood stamp the barrel.

About two weeks later, I ran across a letter to the Maryland COS from one of the musket inspectors out in the field. He wrote mostly about how gunsmiths really did not like that he wanted to proof all of their barrels by loading it with double the prescribed amount of powder BEFORE they got paid. But he also mentioned that he broke the proofing stamp from use.

Wednesday, July 25, 2018

Coat Linings

As I mentioned in an earlier post, I am in the process of reconstructing many of my current garments to make them more historically correct. Aside from stitching techniques, I am also trying to make my construction in line with extant garments. In my experience, I have found that most reproduction civilian garments are lined with some form of plain light linen because it's cheaper, cooler, and easier to construct than alternatives. However, if you browse the museum collections, you will find that linings are typically a combination of textiles, typically consisting of a silk or worsted woolen fabric on the parts of the lining that may be visible as your body moves and a cheaper fabric (linen) in the unseen back portions.

They most common lining colors that I have come across are gold, silver, and black. While those colors would go well with my green broadcloth coat, I wanted to see if any extant green wool coats were out there and see what they were lined with. That's when I ran across this beauty in the Royal Ontario Museum.

Not only is there an extant green broadcloth frock coat from the 1770s, the ROM has photos of the lining of the matching waitscoat. Check it out. I have never seen anything like this. The only way I could describe this is half-lined. The lining is truly minimalist by only extending to the what may be seen during wear and then quickly terminating into the interfacing. The rest of the waist coat is constructed like an unlined garment, save for the back panels that are fully lined in silk. Strange.

 It makes me curious as to what is going on inside of the coat. Potentially, the silk coat lining may end a few inches past the coat edge. I'm curious as to why this was done. Perhaps, the customer only had a set amount of silk and the tailor was working around a shortage? Perhaps, the customer wanted and unlined suit for summer wear, but still wanted to give the appearance of a lining? But what's the deal with the silk back panels in the waistcoat? Maybe it was altered?

Whatever the case this is very interesting.


Monday, July 16, 2018

Finished Waistcoat and Playing a Tailor

Got the waistcoat done in time for my event at Fort Frederick portraying a refugee. Didn't get my diet done in time though 😂 Maybe if I wasn't spending all my time sewing, I would have enough time to exercise. I'm pushing the "tight without constraint" a little bit. I may not be constrained but my buttons sure are.

For this event, I was portraying a refugee tailor who was forced to leave his home in a state of undress, thus only the sleeved waistcoat and no coat. As per usual, no pictures of me were taken at the event, but my wife snapped this one at home before I changed back into 21st century attire. It was a fun event, I spent most of my day working on mariner cuff flaps for for my waistcoat and making death head buttons and talking to visitors.

It was a nice day and a great event. I'm hoping to be doing some new stuff at Fort Frederick in the next few months, but those plans are in the very early stages at this moment.


UPDATE!!! Someone got a picture of doing things! See ma, I don't just dress up like a weirdo for the fun of it.

Word of advice to anyone sewing in a historical manner. Never sit tailor style on a bench. The edge will dig right into your ankle bone and completely cut of the circulation in your foot. Then you may or may not try to stand up and fall over because your foot is completely numb. Spoiler warning: you will fall over. Anyways, here's us sewing at Fort Frederick during the "Repair to the Fort," Pontiac's War event. As always, I'm making a stupid face.