 An unfortunately underrepresented detail in reproduced men's 18th century clothing is the deathshead button. If you were to take a census of the buttons on a group of living historians you would most likely find that metal buttons take the lion's share as they are prevalent on most mainstream clothing. Then you would find cloth covered, which is more accurate to the period. Deathshead buttons taking up the rear.
In reality, metal buttons were rare. A very quick look at period artwork and extant garments illustrates that cloth-covered and deathshead buttons were the most common. The reasoning is simple. Metal buttons were more expensive, and they weigh down the garment in an undesirable fashion causing waistcoats and coats to lose their desired form on the person. Metal buttons are more popular among reenactors because they require no time to manufacture, and they are easy to replace. Those who prefer to be more accurate choose cloth covered buttons because they are simpler to make than the deathshead alternative.
Deathshead buttons are awesome. There is no denying that. They are also a pain in the butt to make. Silk thread is slippery which does not mesh well with the process for making deathshead buttons which is to wrap a square around a circle. I avoided them for the greater part of a year because the thread constantly moved until I learned a trick that makes the buttons turn out great every time.
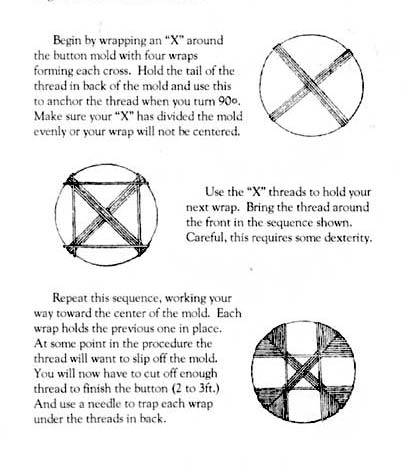
The process for making a button is simple in theory. Wrap three loops of thread around the mould to make an X. Then using the ends of the X as corners, wrap the thread to make a box. Secure the thread on the back and you're done. That works ok for linen thread, but when using silk, the X threads constantly slide so you lose your corners. Also, as you get closer to the center of the box those threads will move as well. Here are a few pointers that I use to make your buttons turn out great every time.
Tip 1 - Create a More Secure X
Instead of just wrapping the thread around the button mould to make and X, I thread the end of my silk through a needle then draw a length through the hold in the center of the mould. I then weave that side of the silk thread through the hole in the center of the mould to create the X. After I've created the X, I secure the crossover in the hole with a knot and cut of the excess leaving the spool side of the thread still attached. Weaving the thread through the hole makes a secure X that does not move no matter what. This is the most important tip and the key to making a good deathshead button. You will use a little more thread, but it's worth it.

Tip 2 - Use a Pin

 The second most frustrating part of wrapping these buttons is that the thread does not stay in place as you get closer to the center. To prevent that from happening, stick a pin through the center so that the thread on the back of the button has an anchor point as you change from wrapping vertically to horizontally and vice versa. On buttons that have a diameter larger than 5/8 inches, you can do a few wraps without the pin, but with smaller buttons I would use the pin throughout.
These pictures show me making a 5/8 inch button using the a pin the entire time. The wraps turn out fairly uniform by themselves and can be adjusted slightly with a pin, toothpick, or other small item that you can use to push the threads into the desired place.
After finishing my wraps, I will loop the thread around the pin on the back of the button a few times to anchor everything in place. Then I cut the thread and use a needle to secure the back in place.
I have found that smaller buttons do not turn out looking as well as larger ones. My 1 1/4 inch buttons for my frock coat look exponentially better than these smaller buttons for my waistcoat.
Tip 3 - Get Some Pliers
Securing the button in place can be the hardest part if you don't have the right tools. If you made your button correctly the center is a tight mess of strong silk thread. Driving a needle directly through the center of that mess to secure the center in place is no picnic. Take my advice and forego strong manning it by using a thimble and a pair of pliers. Use the thimble to push the needle through the button until you can see the point on the other side, then use your pliers to pull it though. It will save you so much time, not to mention holes in your fingers.
Tip 4 - Buy Enough Thread
Deathshead buttons look awesome, but they use a lot of thread and are expensive. Button moulds are about $0.80 a piece and silk thread is about $6.50 per spool. In my experience, you can make three 1 1/4 inch buttons from one spool of thread, or eight to 10 5/8 inch buttons. An average frock coat has 28 buttons, so you're talking about nearly $90 to make your buttons. That may be expense, but it is totally worth it to be the most macaroni person out there.
No comments:
Post a Comment