Wednesday, January 22, 2020

London Town Immersion Day 2020

The Runaway. Photo by DriftingFocus Photography.
Winter is cold. I don't care if it's 2020 or 1771, it's cold. Honestly, despite all the science, it's colder for us in 2020 than it is in 1771 for on reason alone: HVAC. Subfreezing temperatures feel much colder to someone who is accustomed to a 70 degree climate on the regular. Enter London Town Immersion, where participants willingly throw aside modern conveniences for a weekend to rough it out 18th century style. And I mean rough. For the weekend we are living in non-insulated, lapped buildings that you can see light and the outside through the slots in the siding and roof.

Lasting the day in such an environment is not as bad as you would think given the proper application of 18th century chap stick (beeswax and olive oil), the night is a different story. But I'm getting ahead of myself.

I participated in the LT Immersion Day last year, and had such a grand time that I did it again this year. This year though, the wife came too. She worked in the kitchen all day as a convict servant and kitchen maid (while 14 week pregnant), and I caused trouble in the town, well in between minding the oven and making sure everything else was operational.

Allie roasting coffee in the fire. Photo from DriftingFocus Photography
For this year, my friend Jacob and I were portraying runaway convict servants on the lam and en route to somewhere else outside of the realm of where no one is looking for them. As runaways, we were posing as itinerant laborers working for food and shelter during our travels. We used fake names, had fake back stories, and hoped that no one realized that we looked like the guys described in the reward posters that were posted around town. It was a heck of a lot of fun.

In between that, we were causing general mayhem in town by pulling visitors into our shenanigans and through unexpected letters that were delivered to other interpreters causing rifts and dramas that were so much fun to watch. There was also supposed to be a foot race, but the bad weather unfortunately prevented decent visitation for the day so there was really no point to it.

Sleeping in the cold: two linen sheets, 4 wool blankets, and a beg rug
Speaking of bad weather, it was not the greatest. Friday was just bone chilling cold. Saturday started with snow, which eventually turned to sleet, and then freezing rain, which leaked through the ceiling of our house and caused us to relocate since our sleeping space was soaked.

One thing that I have come to realize about cold weather, is that we are simply more wimpy about it than our historic counterparts. No one likes being cold, no doubt about that. Modern people are simply not used to the oppressive and constant cold that people hundreds of years ago experienced. The most common thing that I hear from 21st century reenactors is their inability to sleep because their feet are cold. It's true, cold feet really do prevent people from sleeping. Once you start getting used to it after a few cold events, it does get easier. I think that I've finally reached that point because I slept like the dead in the 20 degree weather.

Thursday, January 2, 2020

New Year, New Stuff, Something Else Cheesy

Me on January 1 2020, wearing the coat that I finished on NYE.
It's a new year. I could do a year in review post, but honestly it would be a long list of metrics that no one cares about and garments that you will never see because I'm terrible at taking pictures. Long and short of it though. During 2019, I completed 78 projects (that a project every 4.67 days), sewed over 300 buttonholes, participated in about 12 large events (many small ones in between), volunteered over 100 hours in historic interpretation, grew as an tailor, maker, interpreter, and mentor, and was terrible at updating this blog.

The growth thing was big for me in 2019. I grew a lot, honed and upped my abilities by taking risks and challenging myself to do new things that I didn't think I'd be capable of at the beginning of the year. The results show. Looking at my kit at the start of 2019 vs the first day of 2020, the difference is very apparent for the better. The super sweet handmade shoes that I got at the end of the year also help :-)

How can you achieve this level of awesome dear reader? Get out there and do history. Don't just read about it, drool over clothes and look at what other people are doing. Do it yourself, if you want to get better.

Figure out your goals, do your research, and get to it. Yeah, some things you make are going to look terrible, but you have to practice. I'm sewing all the time. I do at least 2 hours a day, with a toddler, and a demanding job. If I can do it, so can you. That's how you get better.

The most rewarding thing for 2019 was mentoring two of my friends to start making their own clothing. Luckily, they get the luxury of fitted patterns to start with, but I won't begrudge them that added bonus.

2020 is gonna be a fun year. New event, new challenges, and a new addition to our family. We are expecting either a new man at arms or camp follower this summer. Good thing I didn't get rid of any of the 18th century infant clothing that I made last go-round. We're going to need it.

Wednesday, November 27, 2019

Drafting and Making a Bed Gown - An Afternoon Affair

I'm writing this post for a friend, who wants some information on how to make a bed gown. There are a few patterns out there on making bed gowns, but why use them when you can use the source material from 1761. This tutorial is how to make a bed gown based on Garsault's 1761 instructions that were included in Art of the Tailor.

Drafting the Pattern

Before drafting the pattern make sure that you are wearing your stays. You should do this every time you check fit of an 18th century garment, but it's always good to have a reminder.

You will need to take the following measurements: 
  • Sternum to where you want the Sleeve to End
  • Sternum to Bottom point of the garment
  • Arm circumference
  • Armpit to Waist
  • Bust
Once you have these measurements, you are going to draft the pattern. Although my image depicts the full front of the bedgown, your pattern will only be on side of it. You patterns should look like the basic pattern shape in the first image. 

Use the measurement instructions in the second image to draft your bedgown pattern. Note, this pattern does not include seam allowances to add them as you go if you want them.
Basic Bed Gown pattern shape. 
  1. Draw the vertical line from the sternum to the bottom of the garment. This is the Center Front Line.
  2. Draw the horizontal line from the sternum to the end of sleeve, if you a want a cuff add the size of the cuff to the length of the this line. This is the Sleeve Length line.
  3. Take the Arm Circumference measurement, add two inches, then divide by two. This is the Sleeve Width. Starting at the top point of the Center Front Line, measure down the Sleeve Width length and make a mark. Draw a horizontal line at this point parallel the Sleeve Length Line to fully form the sleeve.
  4. Starting at the point your marked for the Sleeve Width on the Center Front line, measure down the measurement from Armpit to Waist. Make a mark.
  5. Take the Bust measurement, add 12 inches, then divide that measurement by 4. This is the Torso Measurement. 
  6. From the mark that you just made for the Armpit to Waist measurement, draw a horizontal line the length of the Torso measurement. At the end point of the Torso, draw a perpendicular line up, to connect the bottom of the torso to the sleeve.
  7. From the bottom point of the Torso, extend that line by 4 inches. Then draw a vertical line down so that the line ends parrallel with the Center Front line. This forms the Skirting.
  8. Connect the bottom of the Skirting to the Center Front line, and you're done. 
You will also need to cut 2 underarm gussets that are squares. I make mine about 2.5 inches, but you can make them whatever size you want.

Cutting the Pattern

Make sure that you make a muslin of your bed gown to check for fit. You will want to make sure that they sleeves are long enough, the body is long enough, and the tightness of the sleeve. It only takes 30 minutes or less to do with a sewing machine so there is no excuse. 

When you cut your pattern you are going to be folding your fabric in quarto. When you trace your pattern make sure that the Sleeve Line and Center Front lines are on the fold. You more than likely are going to have to piece the sleeve. 

Cutting the Pattern Continued: The Infamous Angle Cut

After you've cut out your pattern you are going to make cut up the Center Front line of the garment and then make the infamous Angle Cut for the collar that Garsault talks about. To make the Angle Cut and make the collar, do the following:
How to make the Angle Cut
  • Cut up the Center Front Line to the top of the shoulder. 
  • Continue that cut up another 2 inches
  • Make a 4 3/4 inch perpendicular cut at the top of the center line (or 2 3/8 inch on either side of the center cut)
  • From the ends of the Perpendicular cut, cut back down 2 inches to meet the shoulder line.

Alright, so now you should have a long cut with two weird flappy guys at the top. It may look weird but its right.

Sewing the Pattern

This is the easy part. Mostly straight stitches with even seam allowances, with the exception of the top of the collar, which is not has hard as you would think. Here is how I sew together the bedgown.
  1. On the garment center back, sew a 2.5-2.75 inch box pleat (1 1/4 to 1 3/8 inches from the center back line) from the top of the back down to the waist line (where the slender portion of the body ends) Press that pleat out.
  2. Next you are going to finish the collar shawl collar. To make the collar.
  3. Creating the Shawl Collar from the Angle Cut
    1. Sew together to tops of the tabs created by the Angle Cut. If you are lining the garment, use a 1/4 inch seam allowance, if you are not lining it use a 1/2 inch seam allowance and fell the seam. Now the sides of the Angle cut are the only thing free.
    2. Gather the fabric from the shoulder and back of the bed gown around the angle cut. This will include the box pleat that you just sewed.
    3. Pin the right sides of the Angle Cut sides to the gathered shoulder and neck and sew together using the 1/4 inch seam allowance if you are lining, and a 1/2 inch seam allowance if you are not (then fell the seam). The collar is now complete
  4. Attach the sleeves (if pieced), then sew the sleeves together, remembering to include the gusset at the armpit.
  5. Remembering to include the gusset, sew the side seams of the body.
  6. Sew only the sides of the skirting. If you would like to have easy access to your pockets, leave an 10 inch opening 1 inch down from the top of the skirting on each side. Finish the edges of the pocket openings.
  7. At the top of the skirts, make a box pleat so that the skirt seam joins the waist seam. Sew the tops of the skirting, then whip stitch the pleat to the body so that it stays in place. This box pleat allows the bottom of the skirting to flare out.
  8. Next, do the same for the lining, if you are lining it, or finish all raw seams if it is unlined.
You're done. That's it. You have a a bed gown. 

Tuesday, November 26, 2019

Criticizing Patterns

This post is not what you think it is. I'm not here to criticize patterns; I'm here to criticize people who criticize patterns. Well, sort of.

The idea of this topic came about during a discussion about clothing workshops, and that several skilled and knowledgeable people in this hobby refuse to publish patterns based on their research because of the overwhelming criticism that other researchers and experts have received.

There are many people who spend an exuberant amount of time creating patterns only to be met with a dismissive review of "this pattern is terrible. It doesn't fit, and the instructions are awful," by some neophyte who doesn't actually know what they are dealing with. Let me be the first one to say it ladies and gentleman: with most documented historic patterns, if it doesn't fit, it's not the pattern--it's you.

Seriously, it is literally you. In case you were never told so in school, every human on this planet is different. That is an unfortunate detail that many people in historic sewing ignore and the cause of frustration for those who publish historic patterns.

Most historic patterns are made by copying an the individual pieces of an original garment of known dimensions; the exact same thing that is done with historic clothing books. After that, some of the patterns are scaled to create options in line with modern common sizes, and occasionally dimensions are altered to be more in line with modern sizing conventions. Some available patterns are simply blown up versions of extant garments from those scholarly clothing books.

Ok Sean, you just said a bunch of nerdy stuff, but what does that mean? What it means is that unless you have the exact same body dimensions as the person who own the original garment, you're going to have to alter the pattern to fit you properly.

These patterns are a map to creating an replica of an extant garment. If you want to use the pattern, you are more than likely going to have to do significant alterations to the pattern to make it fit you properly. Thus the importance of making a muslin.

First of all, Garsualt talks about making muslins, so you should too. I make muslins for any new garment that I make to ensure fit and to get accustomed to the peculiarities of the original garment. Personally, I find that I have broader shoulders, longer arms, and a longer torso than most 18th century men, and I anticipate those alterations.

Anyway, I think that I've rambled enough. Be nice to your historic pattern makers, they know what they're doing. Instead of whining, learn how to alter and fit. 

Friday, November 15, 2019

Coat Series Step 4 - Seamed Pocket Flaps

There are two ways to attach pockets to 18th century coats. In the first method, perhaps the easier method, you simply sew the pocket flap in place to the outside of the garment, tack up the seam allowance and then you're done. The second method creates involves a bit more work and creates what is called a seamed pocket, which is far more elegant in my opinion. I'm going to take you through the steps of creating a seamed pocket.

The main difference with a seamed pocket is that the pocket flap becomes part of the coat and is in line with the body instead of simply being sewn to the outsize of the garment. The construction requires a little more work but your pocket flap will look much more elegant and less bulky.

If you are making an unlined garment, I highly suggest using a seamed pocket, since they allow you to cover up all your raw edges on the pocket bag using the seam allowances from the pocket flap. This feature is seen on every unlined 18th century garment that I have seen.

Step 1. Determine Pocket Placement

Pocket placed centered on a line between the buttonhole and bottom of side seam.
The positioning of 18th century pockets is very easy to determine. (If you are using a commercial pattern, ignore the pocket placement on the pattern because it's probably not correct.) The pocket is placed on a line that goes from the edge of the bottom most button hole to the bottom of the side seam. Use a quilter's ruler and some chalk and draw that line on both front pieces. You will have to determine where the edge of the bottom buttonhole should be on the piece with the buttons or else the pocket placement will be uneven. 

Easy right? If you're making a welted pocket, the pocket will go right on this line. If you're using a pocket with a flap, the top corners of the flap will rest on this line. 

Use the curve of the pattern piece to draw a line marking the flap placement.
The flap will be centered on this line. Measure your pocket flap from corner to corner and subtract that measurement from the length of the pocket flap line. Divide the remainder by 2, and that will give you the distance from edges to place the corners of the pocket flap. Measure from the edges of the pocket flap line, and mark where the flap corners should be placed.

Step 2. Draw Flap Lines

Once you have the corner points marked, place your pocket pattern piece with the corners touching those points and draw the curve on the fabric with a piece of chalk. This is where your pocket flap will sit. After drawing the line, baste an even running stitch along the chalk line. You will be using this line as a stitching guide later, so make it evenly spaced as possible. 

Baste and even running stitch on the flap line. Seen from the inside.
On the pocket flap piece, measure in from the seam allowance and sew a similar even running stitch. 

Baste the same stitch on the pocket flap stitching line
Step 3. Pin the Flap in Place

Now that you have running stitches sewn for the flap on the body and flap pieces, you pin the flap to the body piece. Placing the right sides together, use the running stitches to match up the seams and pin in place. You can go overboard on pins if you want, you are trying to match up two seams that are naturally going the opposite direction. Stiff fabrics will fight it. Try to get the seams pinned as flat as possible or else the body above your pocket will be a little lumpy.

Pin the flap from the outside. Sew it down from the inside

Step 4. Sew down the Flap

This is the most important thing to remember. Turn the pattern piece to the INSIDE and sew the pocket flap to the body using a back stitch. Don't ask me why, but if you sew from the outside, the body is lumpy every time. Always sew from the inside.

If you want, you can remove your pins as you sew to check on your work and make minor adjustments.

Step 5. Cut the Pocket Bag Opening and Press the Flap Allowances

Now that your flap is attached, you will need to cut the hole for the pocket bag. Working from the inside, make a cut approximately 1/2 inch from the flap seam to make an opening for the pocket back. As you get toward the edges of the flap, make a 45 degree angled cut to join the bag opening to the corners of the pocket flap seam.

Fold the pocket flap down flat over the body, tuck the seam allowances inside the garment so that they lay flat, and press all of the seams so that everything looks nice.

Next Up... Installing the Pocket Bags

Wednesday, November 13, 2019

Monmouth: It's like having an infant except it's cold... and there are guns

It came and then it went. The capstone event of the season: Monmouth Immersion Weekend. This event is one part war game, one part SERE exercies, one part LARPing, one part RPG, and all parts awesome.

Beginning at 5 p.m. on Friday, we entered 40 hours of non-stop 18th-century British military existence. The scenario was that of a forage war that happened between the British and Continental Armies during the late fall of 1778. We were up against a larger force of Continental forces that held higher ground with a constant view of our position, not to mention the cold and sleep deprivation that comes with never truly being off duty. 

For the next 40-ish hours, we would contend with the rebels harassing our lines, civilians of questionable allegiance, while we sent patrols to scout for supplies and strike the enemy, all over 1600 acres of 18th-century playground. It was awesome. 

The build-up for this event was just as intense as the event itself. To get ready, I sewed three leggings kits for unit member, altered trowzers, drafted a pair of breeches for another member, made a pair of breeches for myself (and some mitts from the scrap fabric), and a new shirt. 

The goings on of the event itself are a bit of an adrenaline-filled blur. I was constantly on the move and at the ready for the next thing. You never really knew what was going to happen next and what was over the next ridge. You could be laying down for a nap, just coming off patrol, or using the necessities, then... boom! You're back on duty with the fire of a musket to go investigate what is going on. 

One of the truly immersive moments for me came when our patrol picked up two guys from different units because one guy was stranded and the other was the only man left from an ambush by the enemy. As we were watching his comrades about to get attacked, I said "well, you're guys are dead. I guess you're coming with us now." And away he went.

It was honestly one of the coolest events I've ever done. Nothing like the powder burn festivals that are put on for spectators. This was an event to see if you could truly hack it as an 18th century soldier for a few days. And I did it. 

I can't wait for the next one. 

Wednesday, October 23, 2019

Hurdy Gurdies in the Colonial America

It's been over a month since my last post, and as usual I've been up to so weird stuff in between. Did some cool events with the boys of the 17th and have been pumping out clothes left and right for all sorts of reasons. My latest focus has been on the hurdy gurdy. I guess it's really not my latest focus, I have been obsessed with them for a few years now. What's changed is that I bought the bullet and bought one.

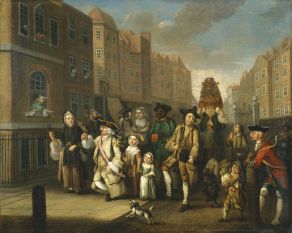
Hurdy Gurdy player is in the foreground in the tan coat from May Morning by John Collett
I won't go into the overall history of the instrument because there a tons of other way more scholarly people than I out there who have written volumes about the thing. My interest, lies in documenting the existence and use of hurdy gurdies in North America, specifically the British colonial parts.

The exercise has been more challenging than thought. Who would think that the task of discovering references to an instrument that is not specifically popular in England proper and typically associated with the lower classes of society in a region where most of the art and writings depict the the upper classes would be difficult? Add to that mix that hurdy gurdy is not always used as the reference term. I've run across references to the instrument as the hand organ, humstrum, and wheel fiddle. The first two terms can refer to instruments other than the hurdy gurdy, but the description of playing the instrument points to the HG.

I have found references though.

The earliest reference that I found is French from 1636. It comes from The Jesuit Relations. Although French, the reference does establish that HGs were in North America by 1636.

They received this answer with pleasure, begging that, as a sign of mutual rejoicing and love, some of our young people should dance to the sound of a hurdy-gurdy, that a little Frenchman held.  This was granted them, to their great satisfaction.

Then I've hit a large gap. The next reference I've found comes from the New Jersey Gazette in 1778. The entry summarizes the publications of a Philadelphia printer, exiled by the British occupation of Philadelphia, who is publishing anti-British, satirical propaganda. The entry is incredibly offense and obviously should be taken with a grain of salt since it is satire. Although the events described never occurred, I would consider this secondary evidence for the use of HGs in the American British colonies based on the author referencing them being played. 

New Jersey Gazette, 8 Apr 1778
Amongst those who left Philadelphia on the approach of the enemy to that city, a Gentleman, who had with him a portable printing-press, took refuge somewhere near Egg-Harbour.  By means of a well-conducted correspondence with a friends in the city, he obtained constant and authentic intelligence of the most minute occurrences there provided, he, for the amusement of himself and a few friends, publishes a paper every fortnight, which he calls Pasquin, or the Minute Intelligencer.
     As these papers are not for sale, and but a few copies struck off, they do not circulate and are but little known.  Being an old acquaintance, he constantly sends me one of his curious performances.  As a specimen of the work, I have selected the following articles.
     It is said the English ministry, having no hopes of subduing America by force of arms, whilst the inhabitants retain their native virtue, have instructed the officers in their army to try a more certain method of success, by debauching the morals of the men, and seducing the virtue of the women.  For this purpose playhouses are opened, gaming- tables established and balls promoted, in a city languishing under a scarcity of the necessaries of life.
     His Excellency General Howe, ever attentive to the health of his army, took the advantage of some fair weather in December last, and determined to give his troops an airing, of which they stood in great need.  For this purpose he ordered the whole of his forces out, and heading them himself, took a walk into the country.  His benevolent intention was to proceed as far as Reading and Lancaster, but finding the roads about Edge-Hill much infested with armed rebels, he thought proper to return to the city; which he did with considerable precipitation, being apprehensive of an approaching storm.  Some think he might have forced his way through the banditti, but he was too prudent a General to expend his Majesty's powder and shot on such a ragged crew.
     We have the pleasure of assuring the publick that the disputes respecting the arrangement of The Royal African Regiment are now at an end, his Excellency having determined that arrangement in the following manner:
     Quaco, Colonel
     Sambo, Lieutenant-Colonel
     Cuffey, Major
     Toney, Captain
     Cudjoe, Captain
The contest for pre-eminence between Quaco and Sambo was long and obstinant: it is evident that Sambo had the thickest lips and the whitest teeth, but his Excellency's partiality is in favour of Quaco, as he has honoured him with his company; and at the entertainment lately given by the officers of the Royal African Regiment, his Excellency opened the ball with Colonel Quaco's Lady, and danced very gracefully to the music of a full orchestra of banjoes and hurdy-gurdies. - How far the superior beauty of Colonel Quaco's Lady may have contributed to his promotion, is uncertain.

As I said, incredibly offensive. What can be gleaned from the passage is the probable presence of the HG the British colonies and the societal association of the HG with the lower classes society. A few American travel narratives include references to banjos being played at country dances, typically by the lower sorts or the enslaved.

The next reference is from Boston in 1785 and paints the picture of a rather interesting scene on the streets of the city. Although America did not have the likes of Hogarth or Collett to paint the goings on of the lower sorts in society satire, this is about as close as you're going to get. I would love to see what a satirical artist could do with this passage. Again, the persons involved with the hurdy gurdy appear to be of the lower sorts.

The final passage I've seen found thus far is related to an assault and murder that occurred in Charleston, SC on July 4, 1785. In this case, three men were heading to Yammacraw, which appears to be a market in Charleston, to hear the HG women play. On their way, they investigated a disturbance in a house at which point one of the men was stabbed in the chin with a bayonet as he descended the stairs to enter the home, and another was shot in the back from a second story window. The newspaper speculates that the reason for the attack was personal in nature based on one of the attacked men slighting the residents of the house from which the attack originated.

A secondary article that was published later, gives the account from the victims and provides more speculation for the cause of the attack. The article again mentions the HG. Although no HG was physically present in this story, I cannot help but find humor in the instrument in this case being related to crime.

That is what I have managed to collect thus far that is solely related to the Americas. I'm told from another historian that there is a HG that was made in 1775 with an American provenance based on a patriotic eagle engraved on it, but I have yet to locate the item in digital collections. I have some additional English information that I will share in a later post, but my main focus right now will be searching colonial news papers for any HG references in runaway ads, sales notices, or bulletins. Based on the association with the lowers sorts, I assume that I'm not going to find any mentions in merchant listings of goods for sale or instrument makers, but you never know.