Thursday, June 28, 2018

Moving Right Along

Made decent progress over the past few days. Interfacing is completely secured on the front and back. Installed the turnback panels on the front edge, and I installed the pockets. My cat got a lot accomplished too. He managed to cover the entire thing in his hair.

Here's a shot of the interior of the waistcoat. The plain linen lining will be slip stitched to the turnback panel once it's installed to conserve fashion fabric. As is stands right now, this waistcoat will have 29 button holes on it. That may reduce to 25, if I change up my sleeve closure plans.

In the 18th century all buttonhole and buttons were functional. I'm currently researching if jiggers (a button on the inside of the coat to hold the interior panel in place) existed in the 18th century, but have not found evidence thus far. There will be a row of 10 buttonholes on the edge of each front panel, and the buttons will be on the inside edge.

The next big thing that I got done were the pockets. Pockets are something that drive me up a wall. I am a measure twice, measure again, and measure a fourth time just in case kind of person, and pockets just do not required that amount of intricacy. It drives me up a wall. I won't got into too much detail about the process of putting together pockets because there is a video of Henry Cooke sewing a pocket out there on YouTube that is much better than anything that I could put together. Check it out. 

Instead of a tutorial, you just get the finished product, cat hair and all. Deal with it. 

On our next episode: Button hole purgatory. 


Tuesday, June 26, 2018

Progress

Got started on my double-breasted sleeved waistcoat this weekend and things are coming together. My fabric came this weekend, and I have to say that I absolutely love it. I'm using an indigo colored kerseymere from Burnley and Trowbridge, and this fabric is amazing. The color is beautiful and I love how this fabric lays. It even marks well. Too bad that I got purchased the last of it and it was a one-off because I cannot tell you how awesome this stuff is. In a somewhat true-to-history fashion, my fabric came in a 1.5-yard section and two 1-yard sections that I will have to make work to cut all of my pieces.

I got off to a good start this weekend. I cut my linen pieces for the interfacing for the fronts and pockets then coated them with Tragacanth Gum to turn them into buckram. The first coat went fine. After I put the pieces out to dry after the second coat, we had a sudden storm show up and I had to run out in the rain to get them. Luckily, I was able to rapidly dry my pieces with a hair dryer so they weren't ruined and stiffened up nicely. I bet this sort of thing occasionally happened in the 18th century, and I wonder what they would have done in place of using a hair dryer?

These first two images show progress on the pockets. First, you baste the interfacing to the fashion fabric to keep it in place. Then you fold the edges and secure the fabric to the interfacing. Finally, you attach the lining by folding under the seam allowances and sewing an underhand stitch along the edges to secure the fabric. The top example is the finished pocket flap. The bottom example shows the pocket before the lining is attached and the basting stitches are removed.

You can see how nicely the flap cleans up once it's underhand stitched and the basting is removed. I try to keep the stitches small and uniform to keep them like original garments. Unfortunately, occasional imperfections in the linen thread make a clump show up in the outer stitching. Some people do not interface their pockets (I originally didn't), but I've found that they stay in place better and retain their shape on your body better if you interface them. 


If my waistcoat were a turkey, there is no chance that it would be dry with all the basting that I did. Can we first get into how ridiculous the interfacing piece looks? If you want the entire front panel to say in place you have to interface it. Everything about this waistcoat is ridiculous, and I love it. 

Cutting the interfacing piece was a bit interesting. to achieve that interesting shape, I traced the outside edge of the front panel piece on my linen for interfacing. I continued around to trace most of the neck and a few inches of the bottom of the piece. Next, I took the interfacing piece from the single-breasted waistcoat that this pattern is modified from, and lined up the back edge of that piece to the matching location on my pattern and drew the back line for the interfacing piece. I set the interfacing back 1/4" and basted the outside edge of the interfacing.

This was the first project that I've gone baste crazy on the interfacing and it is completely worth it to make your front much smoother and reduce the chances of loose fabric. When basting, I suggested working from the outside edge in to ensure that everything goes down smoothly.


 Personally, I baste from the wrong side of the fashion fabric on the edges of the interfacing to make sure that everything is in place properly, but base from the right sides in the big empty spots to make sure that the fabric is laying flat. If you have nice hard interfacing, you can't tell if your fashion fabric is laying flat against it unless you can see it. Doing the basting on two different sides leads to some pretty cool patterns on the fabric though.

On our next episode, we will be finishing the fronts by securing the edges and interfacing, adding the pockets and flaps, sewing on the turn backs, and sewing the button holes.


Friday, June 22, 2018

Hot Sticky Sweet

Leopard print: not just something for 80s hair bands. It also belongs to the 18th century. If you haven't gone to see it yet, you really should check out CW's current exhibit on printed textiles. It's absolutely fascinating. If you're lucky enough (as we were), you'll get a chance to speak to one of the curators and get all the pressing details about the printing process. One thing that you will notice upon entering the museum is a picture of Mark Hutter, one of their tailors with over 30 years of experience in historic tailoring, sporting the kick-awesome leopard print weskit.

My first thought was: That is so ridiculous! I need one of those!

My second thought was: Maybe I should research it first. But seriously, need one of those.


Leopard print in late 18th century men's clothing is like buying a new model of car--you didn't realize how much of it was out there until you started looking. It is currently believed that the fashion most likely originated in Italy and brought into English fashion by the Macaronis after completing their tours of the continent. The Gentleman in the painting "An Interior with Elegant Company" by Venceslao Verlin was painted sometime between 1760-1780 and shows a fantastic example of matching weskit and breeches.

Leopard print is seen in various examples of English art, the most famous is probably the 1778 portrait of John Campbell, 1st Baron Cawdor. I can only image that he is pointing to the exact location that he would like to have sugar poured on himself.


In these paintings, the fabric appears to be printed velvet. Indeed the created garment at CW is made of cotton velvet, but leopard clothing was made from various textiles including printed silks and linens and actual leopard pelts. A great study of the types of textiles, including more images, can be found here: https://darthkendraresearch.wordpress.com/2015/03/26/leopard-print-in-the-late-18th-century/ Once I finally undertake making my own, I most likely will be using cotton velvet simply because finding a silk or linen print will probably be next to impossible in the 21st century.

The last thing that I want to talk about are these two last English prints. The first, called "The Macarony Dressing Room," from 1772, shows a man on the left side of the room wearing a leopard weskit and breeches. The interesting thing about this picture is that the wearer of leopard print is not the Macaroni himself, instead it is an older portly man without the fashion sense of the Macaroni. We have evidence (though satirical) that leopard was not reserved for the overly foppish and highest rungs of society. Everything about this man seems commonplace. No large wig, no rococo embellishments on his clothing. Everything about him is common, he's wearing a plain coat and his hat isn't even cocked. Side note: What is going on with his right foot? I'm not sure if the artist made a mistake or is trying to depict him with a deformity or missing a foot?

What's the point of this? Perhaps if leopard was being worn by midling persons, there is also a possibility that it was being worn in the colonies. I will continue to search runaway ads and inventories for proof, but it's a pretty good theory.

 The final picture is the famous Dawe mezzotint called "The Macaroni" from 1773. In this particular version of it (because there are many altered versions that change details, add color, etc.), you can make out a pattern on his waistcoat and breeches. The seem to be of some close repeating, non-symmetrical dot pattern. As polka dots did come into the fashion scene until the mid-19th century, what are those dots most likely? You guessed it: Leopard Print. One of the most famous 18th century fashion prints, and one that I have hanging in my sewing room includes leopard print. It was hiding under my nose the whole time.

Wednesday, June 20, 2018

Facepalm or Burn it all down!

Research and learning are double-edged swords. Although they will make you more of an expert, they will also make you realize how much you didn't know. If you're lucky, you ignorance will fall within the realm of small unnoticed details. Occasionally, they will be systematic and huge. My realization falls within the substantially sized category.

I've learned a fair deal about sewing both modern and period techniques in the past year that I've been undertaking this adventure, but I am by no means an expert. I've helped others and am dangerous enough to start a blog, but now the real fun starts. It's amazing (and frustrating) to reread books that I looked at when I first got into this hobby with a new understanding and realize that a lot of what you've done is wrong. And so, in true 18th century fashion, I will be tearing apart a good deal of my clothing and redoing it.

Why on earth would I be doing something that stupid? Easy! Although my patterns are period correct, my construction methods are not. My next undertaking  (in between other projects) will be to pull apart my exiting clothing and reconstruct using period methods. Through research, I realized that my construction methods have not been period correct and reflective of modern construction. One redeeming detail is that all the pieces are there and the right shape, they're just not put together as an 18th century tailor would have.

So where did I screw up? For one, all my pieces are bag lined and have 5/8" seam allowances. I probably won't be correcting this detail throughout all my existing garments simply because most of the details will not be seen, but I will be correcting the allowances on the the edges. That brings me to my next screw-up, attaching the lining to the garment edges was not done using the period-correct underhand stitch. This will be the fun detail to correct, but it will make my clothing visually correct if I'm wearing it.

We live, we learn, we invest in a good seam ripper.

Thursday, June 14, 2018

Drafting My First Pattern

This was my first time drafting a pattern, and I didn't completely screw it up! I screwed it up some, but not completely. In theory, I know how to draft a pattern from a book using known measurements. Of course, I have to choose to create something that I have never seen a pattern for in my life for my first drafting project.

Backup for a second. Before I could even start creating a pattern, I had to figure out what I was planning to do. This pattern is going to be for a double breasted sleeve waistcoat. Double breasted waistcoats seem to be common enough as seen in military and sporting attires. From a pure review of extant garments and original images the sleeved variety seemed less common. But then again, who knows what's going on under a frock coat sleeve.

From looking at images and extant garments, I noticed two prevailing styles of double-breasted waistcoats. In both styles the waistcoat starts as single breasted and then transitions to double breasted around the waistline. The first involves an angled flap that starts close to the center closure and gradually widens to the center shoulder at the top of the flap. In the second style, the flap dramatically comes out from the closure and forms a nearly vertical flap from the waistline to the shoulder. Both styles can be seen in my drawing and are highlighted in the these portraits and engravings.

I elected to create my pattern based on the angled flap transition, as I am basing my design off the sleeved waistcoat seen in the included engraving. To create the pattern, I am using an existing waistcoat pattern that I already have and modifying the front panel to include the flap to make it double-breasted. Otherwise, I am using all existing pieces from the current pattern.

To start, I traced the current front panel piece on my paper, which you can see in the above picture after the fact. I then determined the point that I wanted the flap to start at on the waistline, and drew a 2 inch line perpendicular to the pattern edge to start the flap.

To create the top portion of the flap, I thought (and this is where i screwed up) that the flap should close on the collar following the same curvature and length of the main body collar. To accomplish this, I flipped the pattern piece and placed it on top of my tracing to that the two center points touched. I then adjust the angle until it was symmetrical. (For reference: the correct angle for me was when the corners of the bottom inside piece of the front panel were touching.) I then traced to the top of the collar on the flipped pattern piece, and accounted for the seam allowance in the corner. Finally, I joined the bottom edge of the flap to the top edge of the flap to create this beauty.
 Unfortunately, this piece was only 95% correct. What I failed to realize is that duplicating the collar angle exactly, puts the flap up too high on the shoulder and it makes the angle of the flap too dramatic. The angle to extend the flap was correct, but the flap was far too long.

After making a muslin, I discovered this error and corrected it by first marking the point on the collar to where I wanted it to end, and the point on the flap edge where I planned to have the collar opening start from. I cut between the two points, and the results were exactly what I wanted. (Well nearly exactly; I could stand to lose a few LBs. My muslin is a little tighter than usual.)

Now that I've adjust the cut on the muslin, I will go back and adjust the pattern piece to match. Then I can get started on the actual waistcoat... and a diet.

P.S. Yes, I know that I've got the top flap backwards in my picture. It's easier to pin that way as a lefty.

Wednesday, June 13, 2018

Double Breasted Waistcoats

I first saw one of these on a visit to Colonial Williamsburg. The double breasted waistcoat is the primary dress of most of the male shop workers, and I have to say that I absolutely love the look of them. There is just something about the transition from single breasted at the bottom, to double breasted at the top that just says: "Damn! That's a cool waistcoat."

I've been looking for something more convenient to wear when sewing in 18th century attire. Although many engravings show tailors sewing in shirts and sleeveless waistcoats, I've wanted something that I could potentially also use in my impression of Jacob Good, militia captain and affluent tavern owner, for undress wear. A workman's jacket seemed a bit too plain and utilitarian for my Good impression, so I was treading the waters of a standard sleeved waistcoat until I remembered these beauties.


These waistcoats can be seen in all sorts of places for all classes as well. There are several examples of men dressed for a hunt wearing them, but they can also be seen on shop owners and in military wear. The attached military portrait is of General John Burgoyne. If a double-breasted waistcoat is fancy enough for "Gentleman Johnny," its fancy enough for Jacob Good.

I absolutely love the finished product seen in this blog: http://historicallyspeaking.driftingfocus.com/2012/01/20/completed-project-linen-double-breasted-sleeved-waistcoat/

I will be basing my design off of this complete reproduction as well as Gentleman Johnny's waistcoat.  It will have a similar button design and placement to the Historically Speaking reproduction, but I will include complimenting internal fabric like Burgoyne's waistcoat. I plan to make it using indigo kerseymere, available from Burnley and Trowbridge, the internal color is yet to be determined.

The learning experience for this project will be drafting my own pattern. There are no commercial patterns available for a double breasted waistcoat, so I will have to make my own. I'm not quite ready to dive head-first into the deep end though, so I plan to use and existing pattern that I have and draw on the additional portion on the front to make the closure. This sounds good in theory, so it will probably go terribly in execution.

Tuesday, June 12, 2018

Two Week Breeches Challenge: Time's Up!

Welp, I failed. Didn't get it done in time. I was five buttonholes and 15 cloth-covered buttons short of a complete pair. Oh well.

Truthfully, I looked at the weather forecast for the weekend and made the conscious decision not to finish them in favor of sewing 10 eyelets for my wife's stays. I'm all for breaking in new clothing, but soaking them in pouring down rain is not my preferred method.

What did I learn? Breeches are not quite the boogey man that everyone makes them out to be. Yes, they are complicated and are constructed of an unusual amount of pieces, but they are manageable once you know what you are doing. My skills have greatly improved since my first sewing project, but I fear that I'm starting to get sophomoric confidence that will lead to a large mishap in my near future.

On to the next thing.

Thursday, June 7, 2018

The Fin-hole Countdown: The Countdown

Left to Go:

June 6
Buttonholes: 17
Buttons: 15
Eyelets: 6

June 7
Buttonholes: 17 14
Buttons: 15
Eyelets: 6 0

Wednesday, June 6, 2018

Two Week Breeches Challenge: It's the Fin-hole Countdown!

Cue the music: IT'S THE FIN-HOLE COUNTDOWN! Da-da-da-daaaa. Da-da-da-da-daaaa. (And now both you and I will have that song stuck in our heads for the rest of the day.)

I've done it! the breeches are done (almost). You can't wear them, but all of the pieces are together and they are (nearly) functional. All that needs to be done are all of the buttons and associated nonsense. I'm two days behind my schedule, and need to get everything done by bedtime on Friday to successfully complete the challenge.

The remaining work almost reads like a professional wrestling ad. "In three days time: 17 buttonholes, 15 buttons, 6 eyelets. Only one will enter, but will he leave."

In all seriousness though, I'm very happy with how these turned out. I absolutely love the wine colored wool. I did make a few minor adjustments to my pattern to make the breeches more historically accurate, such as removing the back gusset. Not that there is anything inaccurate about the gusset. Extant garments and paintings simply depict that it was not as common as breeches without gussets.

I also ran across a few snags such as having to resize some of my pattern pieces because the wool moved during cutting and having to recut a leg placket because it decided to go for a walk about.

The second go round was much easier than making my first pair. Not only because now I know how to put these things together, but I have also noticed a major improvement in both my sewing abilities and also the quality of my stitches.

Monday, June 4, 2018

Two Week Breeches Challenge: One Week In

It's Friday again, which means that I'm one week in now. Of course, I'm not quite as far along as I'd like to be. I'd like to have the whole construction of the breeches done, and only have the finishing left to go i.e. buttons and button holes. I will have to settle for the completed main part of the breeches. Here they are. Side note: There is no good way to photograph a pair of breeches unless they are on you. Nothing about these stupid things can be easy!


I still need to attach the fall lining, waistband, and finish the legs. If I can get all of those things done over the weekend, I think that I'll be in a good place to meet the deadline. (Spoiler alert: I didn't get all of that done).

Tune in next time for more trash talk directed at a piece of clothing

Friday, June 1, 2018

Two Week Breeches Challenge: Days 6-7

Before I go any farther with progress updates, I would like to address my construction order for these breeches.

If you have never made a pair of breeches before and are using a new pattern, do not follow the same order that I'm using. If you have never used the pattern before, make the waist and knee bands first to make sure that they fit properly before starting on the meat of the breeches. I am using a pattern that I know fits me properly, and am sewing out of the commonly accepted order to work around my schedule. Because my primary sewing time is after my daughter goes to sleep, I try to get all of my long seam sewing done after she goes to bed, when I know I will have a few hours to devote to sewing. Apologies for the out-of-order construction, but it is what it is.

Now, back to our regularly scheduled programming...

Day 6 - Wednesday

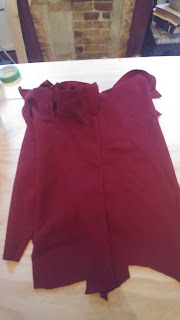
I'm caught up! I think... maybe. Today I got the second pocket facing attached and top stitched. Then I attached both "pocket linings" and sewed the front pieces together at the crotch seam. I know it doesn't seam like much, but it's actually a decent amount of work. The breeches are starting to look more breechy. This picture shows the fall front in a closed state. I still need to attach the fall lining but will do that a little later, as I will be cutting it from 3.5 oz linen for added comfort.

I really hate that the inside pocket piece is referred to as the lining, because it lessens the importance of the piece--it's really important. The piece actually becomes the top piece of the body of the breeches that attaches to the back panels via the side seam and to waistband. Unlike most linings, you can't discount it and need to take care cutting and attaching it or you will screw up your breeches.

 The picture above shows the breeches with the fall down.You can see the detail on the pocket flaps and can make out how the pocket lining under the flap becomes the top part of the breeches that you will sew to the back panels.

Day 7 - Thursday

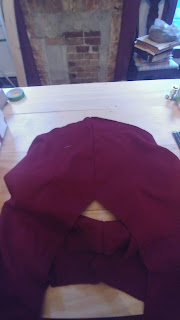
Well, I have a giant, funny looking woolen skirt. If you try to put these on yourself at this stage in the construction, that's what they will look like. You can see the ridiculousness in the picture on the right. I had to fold the back fabric over a few times so that I could get the whole thing in the frame. Because breeches have the diaper butt when completed that means there is a surplus of fabric before you attach the waistband. Breeches are definitely the mullet of 18th century clothing. I've attached a less ridiculous view of the butt seam.

I made good progress today. The back pieces were attached to each other and then to the front pieces on the outside side seams. Sewing the side seams is probably the most challenging part of breeches construction in my opinion, because there are a lot of pieces that can easily cause mistakes if they are not placed and pinned properly.

When sewing the side seam, you sew the front leg piece to the back leg piece for most of the seam. Once you get to where the pocket flap starts, the back leg piece gets sewn to pocket lining, and the lining becomes that top part of the breeches body.

What makes this so challenging is that to properly attach everything you need to make sure that the pocket flap is tucked down into the leg so that you don't accidentally sew it into the side seam. You also need to make sure that notches cut where the pocket lining becomes the body doesn't gap or you will have hole in the side of your breeches.

The pocket flap solution is pretty self explanatory: DON'T SEW THE FLAP INTO THE SIDE SEAM. End of solution. Making sure that you don't have a gap where the pocket lining becomes the breeches body is a bit more complicated. I solve it by first using pins to prevent gapping. Then I sew a bar tack across the two pieces tighten up that joint. Is the bar tack overkill? Probably, but I haven't had a gap to date.


The pictures below show detail on the sewing. The two pins close together toward the top of the first picture are at the crossover joint for the side seam. The second picture shows the completed seam with all of the various pieces together in a rat's nest of fabric.

In case you're wondering yes, I draw on all of my seam allowances. I'm obsessive compulsive about my seam allowances all being correct and uniform. I will draw on all allowances unless I'm sewing a straight piece of linen and can use the threads to keep everything consistent. Eventually, I hope that I'll be more confident in my spacial acuity that I won't have to draw on every seam allowance before putting needle to fabric.