If you have never made a pair of breeches before and are using a new pattern, do not follow the same order that I'm using. If you have never used the pattern before, make the waist and knee bands first to make sure that they fit properly before starting on the meat of the breeches. I am using a pattern that I know fits me properly, and am sewing out of the commonly accepted order to work around my schedule. Because my primary sewing time is after my daughter goes to sleep, I try to get all of my long seam sewing done after she goes to bed, when I know I will have a few hours to devote to sewing. Apologies for the out-of-order construction, but it is what it is.
Now, back to our regularly scheduled programming...
Day 6 - Wednesday
 I'm caught up! I think... maybe. Today I got the second pocket facing attached and top stitched. Then I attached both "pocket linings" and sewed the front pieces together at the crotch seam. I know it doesn't seam like much, but it's actually a decent amount of work. The breeches are starting to look more breechy. This picture shows the fall front in a closed state. I still need to attach the fall lining but will do that a little later, as I will be cutting it from 3.5 oz linen for added comfort.
I really hate that the inside pocket piece is referred to as the lining, because it lessens the importance of the piece--it's really important. The piece actually becomes the top piece of the body of the breeches that attaches to the back panels via the side seam and to waistband. Unlike most linings, you can't discount it and need to take care cutting and attaching it or you will screw up your breeches.
The picture above shows the breeches with the fall down.You can see the detail on the pocket flaps and can make out how the pocket lining under the flap becomes the top part of the breeches that you will sew to the back panels.
Day 7 - Thursday
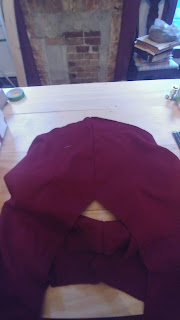
 Well, I have a giant, funny looking woolen skirt. If you try to put these on yourself at this stage in the construction, that's what they will look like. You can see the ridiculousness in the picture on the right. I had to fold the back fabric over a few times so that I could get the whole thing in the frame. Because breeches have the diaper butt when completed that means there is a surplus of fabric before you attach the waistband. Breeches are definitely the mullet of 18th century clothing. I've attached a less ridiculous view of the butt seam.
 I made good progress today. The back pieces were attached to each other and then to the front pieces on the outside side seams. Sewing the side seams is probably the most challenging part of breeches construction in my opinion, because there are a lot of pieces that can easily cause mistakes if they are not placed and pinned properly.
When sewing the side seam, you sew the front leg piece to the back leg piece for most of the seam. Once you get to where the pocket flap starts, the back leg piece gets sewn to pocket lining, and the lining becomes that top part of the breeches body.
What makes this so challenging is that to properly attach everything you need to make sure that the pocket flap is tucked down into the leg so that you don't accidentally sew it into the side seam. You also need to make sure that notches cut where the pocket lining becomes the body doesn't gap or you will have hole in the side of your breeches.
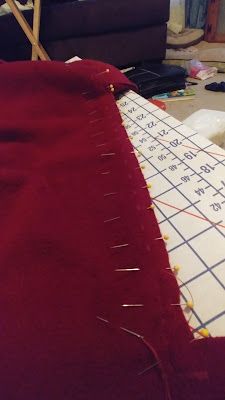
The pocket flap solution is pretty self explanatory: DON'T SEW THE FLAP INTO THE SIDE SEAM. End of solution. Making sure that you don't have a gap where the pocket lining becomes the breeches body is a bit more complicated. I solve it by first using pins to prevent gapping. Then I sew a bar tack across the two pieces tighten up that joint. Is the bar tack overkill? Probably, but I haven't had a gap to date.
The pictures below show detail on the sewing. The two pins close together toward the top of the first picture are at the crossover joint for the side seam. The second picture shows the completed seam with all of the various pieces together in a rat's nest of fabric.
In case you're wondering yes, I draw on all of my seam allowances. I'm obsessive compulsive about my seam allowances all being correct and uniform. I will draw on all allowances unless I'm sewing a straight piece of linen and can use the threads to keep everything consistent. Eventually, I hope that I'll be more confident in my spacial acuity that I won't have to draw on every seam allowance before putting needle to fabric.


No comments:
Post a Comment